Signage & printable · 7 min read
Transfer tape for vinyl: how to choose it and how to use it
Transfer tape explained: paper vs clear, light to high tack, the best transfer tape for permanent vinyl, and step-by-step how to apply it to cut vinyl.
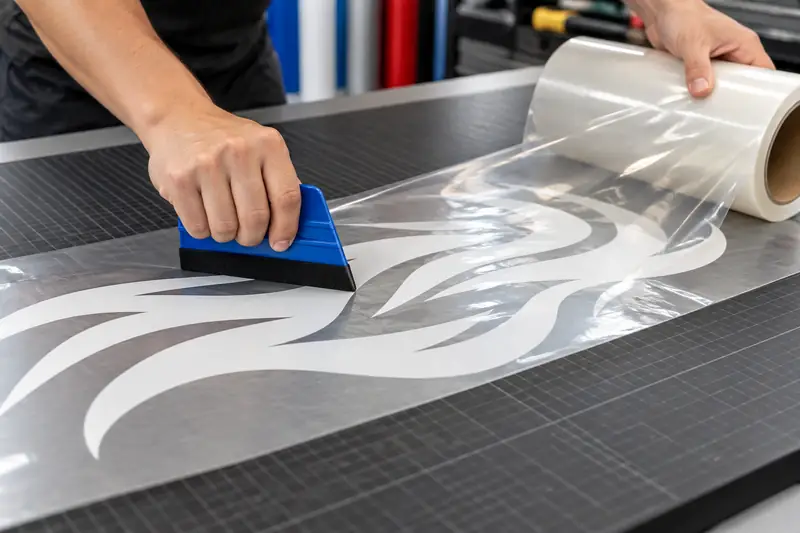
Short answer: Transfer tape is a low-tack application tape that lifts weeded vinyl off its liner as one piece and holds the letters in position until they stick to the final surface. Choose clear tape for precise positioning and paper tape for large flat jobs. Match the tack to the vinyl: medium for most permanent vinyl, higher for textured films.
Transfer tape is the step between a cut, weeded design and a finished sign. Pick the wrong tape and letters stay stuck on the liner, or refuse to let go of the tape on the wall. This guide explains the types of vinyl transfer tape, how to match tack to the film, and how to apply transfer tape to vinyl step by step. It is written for sign shops, wrap shops doing lettering, and makers working with cutting vinyl.
Key takeaways
- Transfer tape (also called application tape or app tape) carries cut vinyl from its liner to the surface and keeps spacing between letters exact.
- It comes in paper and clear film versions, and in tack levels from light grip to high tack.
- The tape must grip the vinyl more than the liner does, but less than the surface will once burnished.
- Medium tack is the usual starting point for permanent vinyl. Light grip suits thin films and delicate surfaces. High tack suits textured, glitter and some reflective films.
- Burnish firmly, peel the liner at a sharp angle, and peel the tape off slowly at a low angle.
What is transfer tape?
Application transfer tape is a wide, low-tack tape on a roll. After a design is cut on a vinyl cutter and weeded, the letters sit loose on the release liner. Transfer tape goes over the top. It picks up every piece at once, holds them in the right place, and lets you position the whole design on glass, a panel or a vehicle. Once the vinyl is squeegeed down, the tape peels away and the vinyl stays.
That only works when the tack is balanced:
- Tape vs liner: the tape must hold the vinyl more firmly than the silicone liner does, or letters stay behind.
- Tape vs surface: the surface must hold the vinyl more firmly than the tape does, or letters lift when the tape comes off.
Getting that balance right is most of what "the best transfer tape for vinyl" means in practice.
Paper vs clear transfer tape
| Paper transfer tape | Clear transfer tape | |
|---|---|---|
| See-through | No (only a faint outline) | Yes |
| Grid lines | Sometimes printed | Often printed |
| Wet application | Tolerates moisture; paper can soak through and release | Holds well when wet |
| Lay-flat | Very flat, easy on large jobs | Can stretch if pulled hard |
| Static | Low | Can build up some static |
| Best for | Large flat signs, long lettering, wet application | Positioning, layering multi-color designs, small text |
| Cost | Usually lower | Usually slightly higher |
Clear transfer tape for vinyl is the more common choice for most small and mid-size jobs. Seeing through the tape makes layering colors and lining up with edges much easier, and printed grid lines help with level. Paper tape is favored for long runs of lettering and large flat panels. It lies very flat, does not stretch, and can be wetted to help it release in wet installs.
Tack levels: light grip to high tack
Tack is how strongly the tape grips. Suppliers label it differently, but most ranges fall into three groups.
| Tack level | Use with | Watch out for |
|---|---|---|
| Light grip | Thin calendered films, heat transfer projects with liners, delicate surfaces, removable wall vinyl | May not lift small text or thick films |
| Medium tack | Most permanent and removable adhesive vinyl, standard sign work | Can be too strong for paint-sensitive walls |
| High tack | Glitter, textured, metallic and some reflective films, larger letters | Can pull vinyl back off the surface if the surface is poorly bonded |
Transfer tape for permanent vinyl
For standard permanent vinyl, a medium tack clear or paper tape is the usual choice. It lifts small letters cleanly off the liner and still lets go once the vinyl is burnished onto glass, metal or painted panels. Go up to a higher tack only if letters stay on the liner even after firm burnishing. Go lighter if letters keep coming back up with the tape.
Light grip transfer tape
Light grip tape helps when the final surface is weak, as with fresh paint, textured walls or some plastics, or when the vinyl is thin and easy to stretch. It is also useful for repositioning a design several times before committing.
Printed vinyl and laminated graphics
Printed and laminated decals are usually contour-cut and thicker. Many are applied with their own premask or a medium-to-high tack clear tape. Effects such as chrome and holographic films can be slick on top; test a small piece first.
How to use vinyl transfer tape
Here is how to apply transfer tape to vinyl and then install the graphic. These steps assume a dry application.
- Weed the design completely, including the centers of letters such as "o" and "a".
- Cut a piece of tape slightly larger than the design, with a margin of about 1–2 cm (half an inch) on all sides.
- Lay the tape down from one edge. Peel back a few centimeters of the tape backing, anchor that edge, and roll the tape down across the design. Keep it under light tension to avoid wrinkles and bubbles.
- Burnish firmly with a squeegee, working from the center out on both sides. For small text, burnish from the back of the liner too.
- Clean and mark the surface. Wipe it with isopropyl alcohol and let it dry. Mark level or center points with masking tape or a grease pencil.
- Position and hinge. For larger graphics, place the design with its liner still attached, tape a hinge across the middle, and check level.
- Remove the liner. Flip one half up, peel the liner back at a sharp angle (close to 180°), and cut it away at the hinge.
- Squeegee the vinyl down from the hinge outward, with overlapping strokes. Remove the hinge and repeat on the other half.
- Burnish again over the whole design through the tape.
- Peel the tape off slowly, folded back on itself at a low angle. If a letter starts to lift, lay the tape back down, burnish that spot and peel again.
Wet application
On glass and large flat panels, a light spray of application fluid lets you slide the graphic into place. Squeegee all the fluid out, then wait before removing the tape. Paper tape can be lightly sprayed with water from the top to help it release. Check the vinyl's data sheet first, as not every film is approved for wet application.
Common transfer tape problems and fixes
- Letters stay on the liner. The tape is not tacky enough or not burnished enough. Burnish harder, or burnish from the liner side. If that fails, step up to a higher tack.
- Letters come back up with the tape. The tape is too strong, the surface is dirty, or it is too cold. Clean again, burnish longer, peel at a lower angle, or switch to lower tack.
- Bubbles under clear tape. Roll the tape on from one edge under light tension instead of dropping it flat.
- Tape stretches and letters shift. Use paper tape, or clear tape with a firmer base, for long lettering.
- Old tape will not grip. Tape adhesive ages. Store rolls in their box, away from heat and sun, and rotate stock.
Tools that go with transfer tape
Most jobs only need a few tools:
- A felt-edge or hard squeegee for burnishing.
- A weeding hook.
- A cutting mat or knifeless tape for trimming.
- A ruler or level for positioning.
- Masking tape for hinges.
Our wrap tools range covers squeegees, knives and tapes. The vinyl wrap tools guide explains which tools matter for wrap and sign work.
Buying transfer tape and cutting vinyl for your shop
A tape that works perfectly on one vinyl can be wrong for another, so test them together. Order samples of the film first from our printable and cutting vinyl line or the printed and effect vinyl range, then run a small cut, weed and transfer test with the tape you already use. At Mars Decorative Film, rolls are batch-numbered, so a reorder of the same color behaves the same way with your chosen tape.
Frequently asked questions
How do you use vinyl transfer tape?
Weed the design, then lay transfer tape over it and burnish firmly. Peel the vinyl off its liner on the tape and position it on the clean surface. Squeegee it down, then peel the tape off slowly at a low angle, leaving the vinyl behind.
How do you apply transfer tape to vinyl without bubbles?
Peel back a little of the tape's backing, anchor one edge, and roll the tape across the design under light tension rather than laying it down flat. Then burnish from the center outward. Small bubbles in the tape do not matter as long as the vinyl itself is fully burnished.
What is the best transfer tape for permanent vinyl?
A medium tack tape, clear or paper, is the usual choice for permanent adhesive vinyl. Clear tape helps with positioning and layering colors. Paper tape lies flatter on long or large jobs.
Can you reuse transfer tape?
Often you can reuse it two or three times on small projects, as long as it stays clean and still grips. Dust, lint and vinyl fragments reduce tack quickly. For client work, fresh tape gives more predictable results.
Why won't my vinyl stick to the surface instead of the tape?
The tape is gripping more firmly than the surface, usually because of dust, wax, cold temperatures or not enough burnishing. Clean the surface with isopropyl alcohol, burnish longer, and peel the tape at a low angle. If the problem continues, use a lower tack tape.
Do you need transfer tape for printed decals?
Most contour-cut printed decals need some application tape or premask, especially if they have separate pieces or small text. Single-piece stickers with a large solid shape can often be applied straight from the liner.